
Views: 0 Author: Site Editor Publish Time: 2025-06-12 Origin: Site
Tiling behind a log burner can be done if you use the right materials and insulation. Ceramic insulation and ceramic fiber insulation keep walls safe from heat and lower fire risks. Experts say to use non-combustible things like cement board, stone, and ceramic tiles. These materials do not burn and help keep the area safe. Many people pick ceramic insulation because it works well and looks nice. You can have both safety and style if you do it the right way.
Use ceramic insulation and materials that do not burn, like cement board and ceramic tiles, to keep walls safe from heat behind a log burner.
Make sure there is enough space between the log burner and the walls or floors. Use heat shields and air gaps to help stop fires.
Follow building codes by putting tiles on cement backer board with a 1-inch air gap. Use glue and grout that can handle heat.
Pick strong tiles like ceramic, porcelain, granite, or slate. These tiles can take high heat and will not crack or change color easily.
Do not make mistakes like putting tiles right on walls that can burn, forgetting air gaps, or using the wrong glue. This keeps you safe and helps tiles last longer.
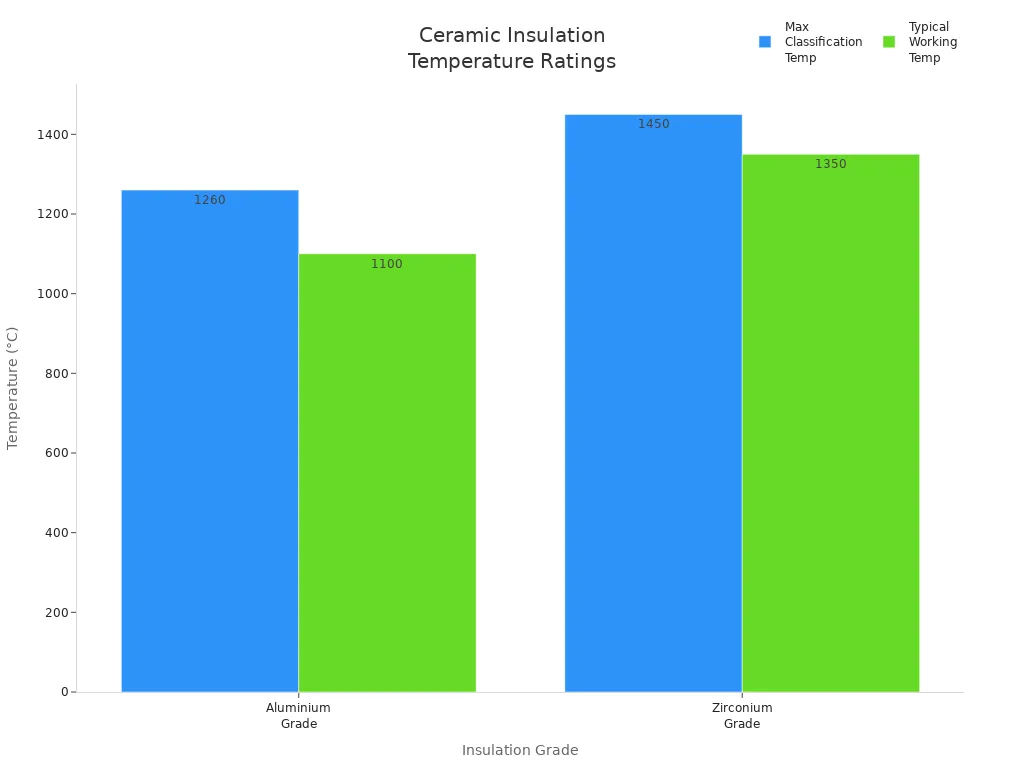
Good insulation behind a log burner keeps your home safe. Ceramic insulation and ceramic insulation board help stop heat from reaching things that can burn. These materials are very good at blocking heat and can take very high temperatures. Ceramic fiber insulation can handle heat up to 2,600°F (1,425°C). This is much hotter than most log burners get.
Ceramic fiber products, like blankets and boards, are made from alumina and silica. These materials do not let heat pass through easily and can handle sudden temperature changes. They do not break or change shape when the temperature goes up or down fast. Many factories, like steel and power plants, use ceramic fiber insulation for very hot jobs. People can use these products at home to keep walls safe behind a log burner.
| Grade Type | Maximum Classification Temperature (°C) | Typical Working Temperature (°C) |
|---|---|---|
| Aluminium Grade | 1260 | 1100 |
| Zirconium Grade | 1450 | 1350 |
Ceramic insulation board and ceramic fiber insulation work better than other materials, like mineral wool or stove boards. Stove boards give some protection but cannot take as much heat as ceramic fiber products. That is why ceramic insulation is the best for high heat behind log burners.
Tip: Pick insulation that can handle more heat than your log burner makes. This helps stop heat damage and keeps heat from escaping.
Clearances are the spaces between the log burner and other things. These spaces help stop fires and keep things cool. Fire safety rules say how far the stove must be from walls or floors that can burn. In the United States, certified wood stoves need at least 36 inches of space from walls that can burn. Stoves that are not certified need even more space.
Some shields, like cement board with tile or sheet metal, can make the needed space smaller. These shields must be put on spacers to make an air gap, usually about 1 inch (25 mm). Air moving behind the shield keeps the wall cool and lets you have less space.
Minimum space from walls that can burn without protection: 36 inches (900 mm)
Shields with an air gap can make the space smaller
Shields must have at least a 1-inch (25 mm) air gap
Floor pads must be made of things that do not burn, like ceramic tile or slate
Floor pads should go at least 18 inches (450 mm) in front and 8 inches (200 mm) on the sides and back
| Clearance Aspect | Requirement / Measurement |
|---|---|
| Minimum air gap between shield and combustibles | 21 mm (7/8 in.) |
| Shield bottom clearance (min) | 25 mm (1 in.) |
| Shield bottom clearance (max) | 75 mm (3 in.) |
| Shield top clearance at ceiling | 75 mm (3 in.) |
| Shield extension beyond each side of appliance | 450 mm (18 in.) |
| Shield extension above appliance | 500 mm (20 in.) |
| Floor pad material | Durable, noncombustible (e.g., grouted ceramic tile) |
| Floor pad extension in front of loading door | At least 450 mm (18 in.) |
| Floor pad extension beyond other sides | At least 200 mm (8 in.) |
| Floor pad installation notes | Must be continuous, noncombustible, and not installed on carpet unless structurally supported |
Clearance rules are not the same in every country. The United States uses EPA and NFPA 211 rules. The United Kingdom uses HETAS and building rules. Australia uses AS/NZS 4013:1999 and the Building Code of Australia. Always check your local rules and the stove manual for the right space.
| Country | Governing Standards / Certification Bodies | Clearance Requirements for Wood Burners | Notes on Clearance Reduction |
|---|---|---|---|
| United States | EPA certification; NFPA 211 standards | Certified stoves: 36 inches to combustibles in all directions | Clearances can be reduced with approved heat shields |
| Un-certified stoves: 48 inches or more to combustibles | Sheet metal jacket stoves: 36 inches clearance | ||
| United Kingdom | HETAS certification; Building Regulations 2000 (England & Wales), plus regional regulations (Scotland, Northern Ireland, Ireland, Isle of Man) | Compliance with building regulations and HETAS certification; specific numeric clearances less explicitly detailed | Follow manufacturer and local codes |
| Australia | AS/NZS 4013:1999 (smoke emissions); Building Code of Australia | Compliance with national standards and Building Code; Tasmania requires emissions compliance | Focus on emissions and installation standards |
Building codes make sure tiles and insulation behind log burners are safe. These codes often follow the stove maker’s instructions. Most codes say to put tiles on cement backer board, not on plywood or drywall. This stops fire risks and makes the wall stronger.
A 1-inch air gap between the tile and any wall that can burn is usually needed. This gap keeps heat from moving to the wall. Noncombustible things put right on wood or drywall do not meet code because they still let heat through. Thinset mortar is the best glue for tile near stoves because it can take high heat.
Note: The stove manual is the most important guide for space, insulation, and how to install. Always follow these steps to stay safe and meet the rules.
Not following building codes can cause big problems. In some cities, breaking these rules can mean fines up to $1,000 or even jail. Bad installation also makes fire, smoke, and health risks worse. Only EPA-certified wood burners are allowed in many places, and burning the wrong things is not allowed.
Building codes depend on the stove manual
Tiles must go on cement backer board
A 1-inch air gap is needed between tile and walls that can burn
Thinset mortar is better than other glues near stoves
Breaking the rules can mean fines or legal trouble
Health risks include smoke and fire dangers
Ceramic insulation board and ceramic fiber insulation both meet tough safety rules for use behind log burners. Their strong heat blocking makes them the safest way to protect walls and stop heat loss in these places.
Ceramic fiber insulation is a top pick for stopping heat behind log burners. You can buy it as boards, blankets, or loose fill. It blocks heat well and does not let much heat pass through. Ceramic fiber products from Yufeng Refractory use pure alumina and silica. These help the insulation keep heat out and hold the wall’s temperature steady.
Ceramic insulation board from Yufeng Refractory comes in different grades. The boards can take heat up to 1,430°C (2,606°F). They are light, so they do not make the wall heavy. The boards do not hold heat for long, so the wall stays cool.
Ceramic fiber insulation is simple to cut and shape. Installers can fit it into small spaces or corners behind stoves. The boards do not shrink or crack when they get hot. They also stand up to most chemicals and water, so they work in many homes.
But ceramic fiber insulation does not last forever. Most ceramic fiber baffles last about five years if used carefully. Over time, the material may crack or break down, especially with lots of heating and cooling. There is no exact data from makers, but most people say the same thing.
Mineral wool is another good choice for insulation behind log burners. Many people think mineral wool works just as well as ceramic fiber insulation. Mineral wool does not burn, is easy to put in, and stops fire well. It has tiny air pockets that slow down heat and act as a buffer. Mineral wool also lets water vapor escape from behind the stove wall.
Ceramic fiber insulation blocks heat and does not let much heat pass.
Yufeng Refractory boards can take heat up to 1,430°C.
Easy to cut, shape, and put in place.
Most last about five years if used with care.
Mineral wool is also safe and works well against fire.
Picking the right tile behind a log burner keeps your home safe and looking good. Tiles need to handle high heat and not crack or change color. Ceramic and porcelain tiles are the most used. Makers fire these tiles at about 2,000°F, so they are strong and do not get damaged by heat. Porcelain tiles are thick and do not stain or get hot easily.
Natural stone tiles like granite, slate, and quartzite are also good choices. These stones are tough and do not get ruined by heat. Granite and slate are liked for their rough look and strength. Marble and travertine look fancy and move heat well, but need more care to stop stains or damage.
Glass tiles are not a good idea behind log burners. They can break if they get too hot or cool down fast. Vinyl tiles and other fake materials are also bad because they can bend or melt.
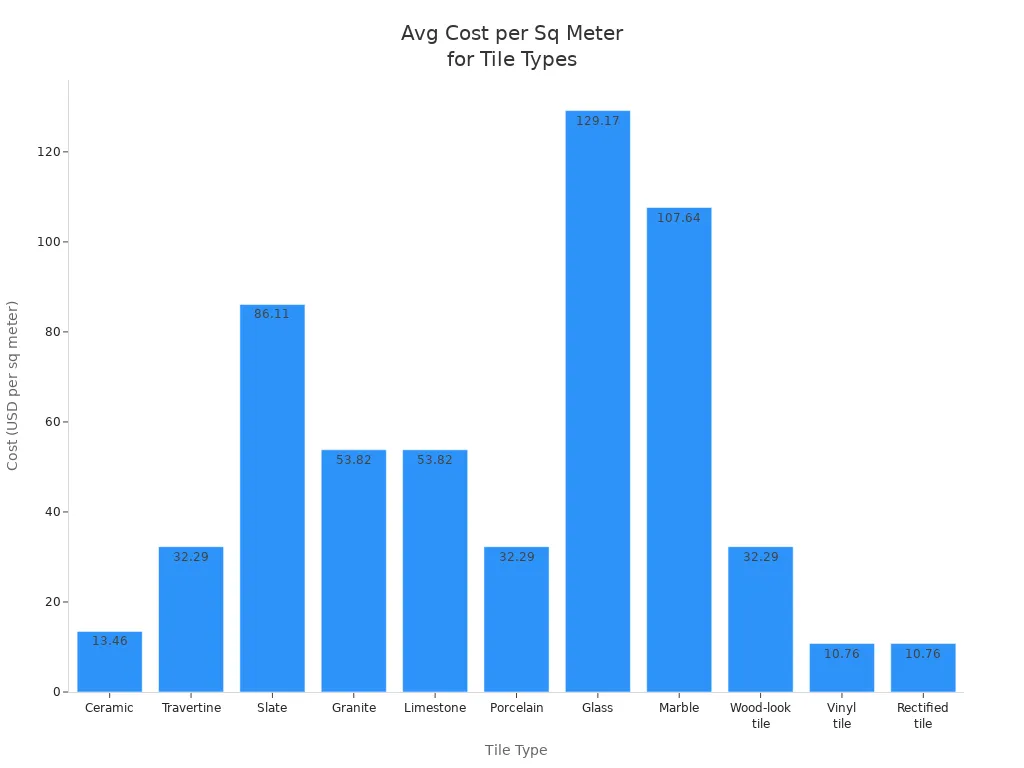
| Tile Type | Average Cost per Square Foot (USD) | Notes on Suitability for Log Burners |
|---|---|---|
| Ceramic | $1.25 to $30 | Strong, cheap, good for heat |
| Porcelain | $3 to $30 | Thick, does not stain, good for heat |
| Granite | $5 to $200 | Tough, good for high heat |
| Slate | $8 to $20 | Strong, does not slip, good for heat |
| Marble | $10 to $350 | Fancy, heat varies |
| Travertine | $3 to $20 | Stone, okay for heat |
| Limestone | $5 | Warm look, okay for heat |
| Glass | $12 to $26 | Pretty, not good for high heat |
| Wood-look | $3 to $30 | Looks like wood, strong |
| Vinyl | $1 to $3 | Cheap, not good for high heat |
Porcelain and ceramic tiles are best for most homes. They handle heat well, are easy to clean, and come in many styles. Granite and slate tiles give a rough or fancy look, depending on the finish. Travertine and marble have special colors and patterns, but need sealing and care.
Porcelain tiles: great at stopping heat, strong, easy to clean.
Granite: tough, does not break, handles high heat.
Slate: stops heat, looks rough and natural.
Travertine: matches many styles, okay for heat.
Marble: moves heat well, looks fancy.
It is important to pick tiles and insulation that last behind log burners. Porcelain and ceramic tiles are strong and do not crack or change color from heat. Porcelain is made from fine clay and fired at high heat, so it is very tough. It does not bend and stays the same even with lots of heating and cooling.
Natural stone tiles like granite and slate are also strong and do not break easily. Granite is known for its power and can take heat and heavy use. Slate does not wear out and fits both old and new fireplace styles. Marble and travertine look nice, but need more work to keep them looking good.
| Tile Material | Durability | Heat Resistance | Notes |
|---|---|---|---|
| Porcelain | Very strong | Handles high heat | Great for hearths and fireplaces |
| Ceramic | Strong | Handles heat | Cheap, lasts long if cared for |
| Granite | Tough, does not break | Handles heat well | Comes in many colors and patterns |
| Slate | Strong, does not wear out | Good for heat | Good for old or new designs |
| Marble | Fancy, handles heat | Good for heat | Classic look, needs more care |
| Travertine | Handles water, softer | Okay for heat | Natural colors, has holes |
| Terra-Cotta | Very strong | Handles heat | Adds a Mediterranean look |
| Glass | Breaks easily | Handles heat | Can crack, not good for high heat |
| Vinyl | Bends easily | Not good | Not good for behind log burners |
Tile styles keep changing. Many people mix old and new looks, using tiles that look like marble, slate, or wood. Eco-friendly tiles made from recycled materials are getting more popular. Mosaic patterns, herringbone shapes, and 3-D tiles make the area look cool and interesting.
Some people put tiles all the way to the ceiling for a bold look. Others use brick or textured tiles to make the space warm and cozy. Digital tools help people see how tiles will look before putting them in, so it is easier to try new styles.
Tip: Pick tiles that can take high heat and do not let much heat pass. Find ones that work well and look good in your home.
Ceramic insulation board from Yufeng Refractory is a good way to protect walls behind log burners. These boards stop heat, do not let much heat pass, and last a long time. They are light, easy to put in, and do not get ruined by most chemicals or water. Yufeng Refractory’s ceramic insulation board works well in fireplaces, stoves, and other hot places. The company also sells ceramic fiber insulation and other products for tough heat jobs.
Getting the wall ready is important for safety. The installer checks the wall for any damage. If the wall is not good, they fix it or put in cement board. This makes a strong base that can handle heat. The wall must be clean and dry before starting. The installer plans how the tiles will go on the wall. They lay out the tiles without glue to see if they fit. Picking tiles that can take heat, like natural stone, is smart. The installer uses glue and grout made for high heat.
Steps for wall preparation:
Check the wall for damage or weak spots.
Fix drywall or add cement board if needed.
Make sure the wall is clean and dry.
Plan where each tile will go.
Lay out tiles to check the fit.
Pick tiles and glue that can take heat.
Glue and grout must work with high heat. Most thinset glues and epoxies do not handle enough heat for log burners. Special products like Vitcas Heat Resistant Tile Adhesive and Grout can take up to 1000°C. These glues stay strong even when very hot. They come ready to use and are made for stoves and fireplaces. Epoxy grout is better than cement grout for heat and water. The installer should wait a few weeks before using the log burner. This lets glue dry and stops tiles from coming off.
Recommended products:
Vitcas Heat Resistant Tile Adhesive (up to 1000°C)
Vitcas Heat Resistant Tile Grout (up to 1000°C)
Flexible cement grout for heat and movement
Safety gear keeps the installer safe from sharp tiles and dust. The area around the log burner must be clear. The installer cleans the wall and puts in cement board if needed. They measure and mark where tiles will go. Tiles are cut with a wet saw for smooth edges. Glue is mixed and spread on small spots with a trowel. Tiles are put on starting in the middle, using spacers for even lines. Glue must dry before adding grout. Grout is mixed and spread with a rubber float, then cleaned with a wet sponge. Sealing grout with heat sealer makes it last longer.
Step-by-step process:
Put on gloves, eye protection, and a mask.
Clear the area and keep it safe.
Clean and level the wall; add cement board if needed.
Measure and mark where tiles will go.
Cut tiles for corners and edges.
Mix glue and spread with a trowel.
Put tiles on with spacers for even gaps.
Let glue dry before adding grout.
Mix and spread grout, then clean extra.
Seal grout to protect it.
Finishing steps keep tile edges and grout safe. The installer uses heat-resistant glue and grout. Grout must be put on carefully and left to dry. Cleaning grout haze with a soft cloth keeps tiles nice. Sealing grout stops stains and water. If using natural stone tiles, add extra stone sealer. For style, the installer can use patterns like herringbone or mosaic. They pick colors that match the room and add special tiles for a cool look. Brick tiles and small medallion tiles make the area stand out. Mixing shapes and colors gives a custom finish. These steps help tiles handle heat and keep the space safe and pretty.
People often make mistakes when tiling behind a log burner. These mistakes can cause fires or make tiles fall off. Some common problems are:
Putting tiles right on walls that can burn, not using cement backerboard.
Using wood spacers, which can hide fire dangers for a long time.
Not leaving an air gap behind tiles, so the wall gets too hot.
Picking the wrong glue, like mastic, which cannot take high heat.
Not following building codes or clearance rules, which can hurt safety and insurance.
Forgetting to protect drywall, which can dry out and catch fire.
Not using metal spacers, so air cannot move behind the tiles.
Making hearth pads too small, so hot embers or heat can reach the floor.
Tip: Always use cement board, metal spacers, and glue that can take heat to stop these problems.
Heat damage behind a log burner can show up in different ways. If drywall peels behind the stove, the wall got too hot. Burn marks or dark spots on wood mean heat reached a dangerous level. If insulation like fiberglass or Rockwool is ruined, the wall needs better protection. Sometimes, black mold grows because water gets trapped, and this can be bad for health. People sometimes think water damage is heat damage, so checking carefully is important. Using insulation boards that can take heat and watching wall temperature helps stop these problems.
Some jobs need a professional installer. People should call a pro if they do not know how to frame, vent, or work with gas lines. Putting in vents means drilling through important parts of the house, and this must follow local rules. Pros know the rules and get the right permits. Certified installers have training and insurance, so they can do hard jobs and give warranties. They also give references and keep the work area safe and neat. Homeowners feel safer and get better results when they hire a certified expert for tricky or risky jobs.
Tiling behind a log burner is safe if you use good insulation and tiles that can take heat. People should follow safety rules and pick products made for high heat. If you are not sure how to do it, ask a professional for help.
Picking safe things keeps your house and family safe. You can have a nice look and strong safety at the same time.
You can put ceramic insulation behind a log burner if you use cement board too. This setup helps stop heat and keeps the wall safe. Always read the stove manual and check local rules for the best way.
Ceramic insulation does not burn and can take high heat. It stays strong even if the temperature changes quickly. Many people choose it because it lasts longer than mineral wool or fiberglass.
Yes, you need a glue that can take heat, like Vitcas Heat Resistant Tile Adhesive. Regular glue will not work near a log burner. Heat-resistant glue keeps tiles stuck and safe.
Most experts say to use ceramic insulation boards that are 1/2 inch to 1 inch thick. Thicker boards stop more heat. Always look at the stove manual to find the right thickness.
Ceramic insulation works with most tiles, like ceramic, porcelain, and natural stone. Do not use glass or vinyl tiles. These can crack or melt from the heat behind a log burner.


